The network illustrating the use of the AVS 5 streamlines and animate lines module is contained in the file ~kpulo/ass2c.net, and is shown in Figure 3.
As can be seen, the network for the animated streamlines is substantially simpler than those in Figures 1 and 2. The reason for this is that the animate lines module unfortunately discards any colouring information given to it by the streamlines module. This is a limitation of AVS 5, a better quality animate lines module could overcome it. As such, the colour related parts of the network were removed, with the added benefit that this improves performance.
Streamlines are generated for the entire data cube of wind velocity data. This
requires a reasonably fast machine to process effectively, such as one of Vislab's
![]() machines. Performance on other, slower machines, especially
where interactivity is concerned, is suboptimal.
machines. Performance on other, slower machines, especially
where interactivity is concerned, is suboptimal.
To animate the streamlines, select the control panel for the animate lines module and press the Animate button. The streamlines will then be animated as short segments, from start to finish of each streamline. The Geometry Viewer allows the view to be rotated and manipulated while the streamlines are animating. This can be exploited to great advantage to get a very good understanding of where exactly in the cube the streamlines are flowing to and from.
Alternatively, the Geometry Viewer's Store Frames feature can be used to store the set of frames generated when the Animate button is pressed, and then replayed at the full speed of the graphics system. However, this is often too fast, and AVS 5 offers no way to control the speed of Store Frames playback.
Again, when the streamlines are being animated, it is very easy to see the strong jetstream (though this time it is at the bottom), the gentler winds in the other direction and the turbulent region in between.
Depth cueing is also enabled by default. This allows the user to see very clearly the closest objects, and their relative distances. In this setting, depth cueing is almost essential to see where streamlines (and streamline segments) belong in the cube. Turning off depth cueing can help to give insights when animating the streamlines, but in a static context disabling depth cueing merely confuses the visualisation.
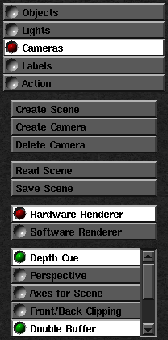
Unfortunately, AVS 5 doesn't provide any controls to alter the amount of depth cueing done. The depth cueing in AVS 5 seems to drop off too quickly, completely obscuring the objects at the back. What would be ideal is a control to change how far back one can see before objects are completely obscured. Figure 4 shows the AVS control panel for enabling and disabling depth cueing in the Geometry Viewer.
An alternative to depth cueing is a direct stereo view, on machines which support it2. In this mode, the system presents a binocularly disparite view of the geometry, typically using CrystalEyes shutter glasses. This gives the illusion of depth, and hence is quite good when visualising a cube of data such as this.
To enable full-screen stereo mode in AVS 5, hold the Control key whilst left mouse clicking in the Geometry Viewer. To disable stereo mode, press Control-left-click again. If AVS 5 does not properly restore the video mode, type m1280 at a Unix prompt3. Note also that depth cueing does not work with stereo mode, and must be disabled as detailed above before entering stereo mode.